Friday, August 10, 2012

Put a Lid On it! (Battery Boxes Get Covered!)

Not yet finished - but on it's way - finally! After having the Battery Box Covers made up for the rear Battery Boxes (long ago!) - I have finally got started on getting them fitted!
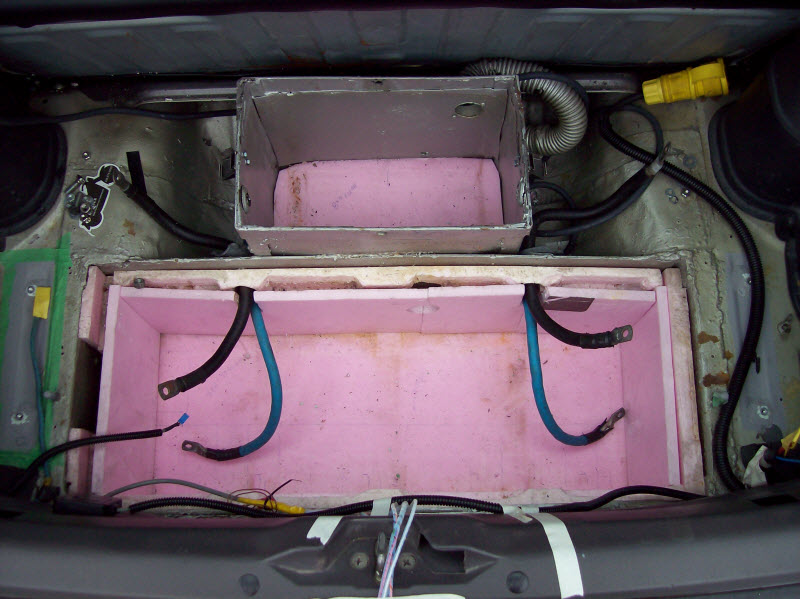
The single battery box - required the total removal of the battery to proceed, so I had decided to take them all out - and have them tested, and cycled and tested again - to see what they would deliver for rated energy! One of our exhibitors for EV Fest 2012 has a 4-Battery cycle and test rig, so he has them at the moment.

Since I had the batteries out - I started work on getting the cover installed for the single.
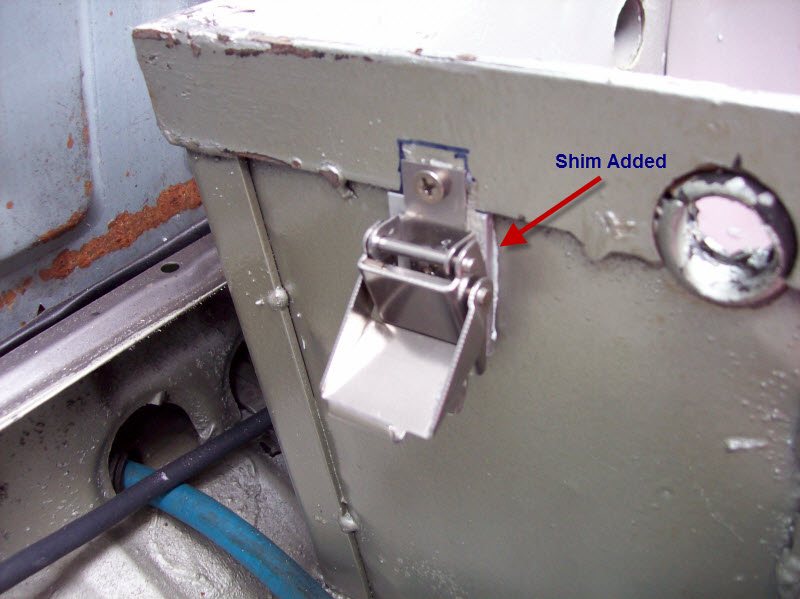
There was a flat strap around the edge - but not wide enough to hold the clamp down bracket - so I cut two pieces of 1/16" x 1" flat aluminum bar about 1.25" long, and secured them in place using 'Mighty Putty' Epoxy that I had, clamped them in place, and let them cure for a day.

Then I used special Double Sided Sticky sheets, to temporarily hold the clips in place, aligning them by putting the lid on and clipping them to the closed position. After Carefully unlocking the lid, I clamped the clips in place one by one, and drilled first one hole, then bolted it and checked the cover fit - tweaking it for any alignment needs, before clamping the clip again to drill and bolt the second hole. I Did the same on both sides, then finished to tighten down the bolts.
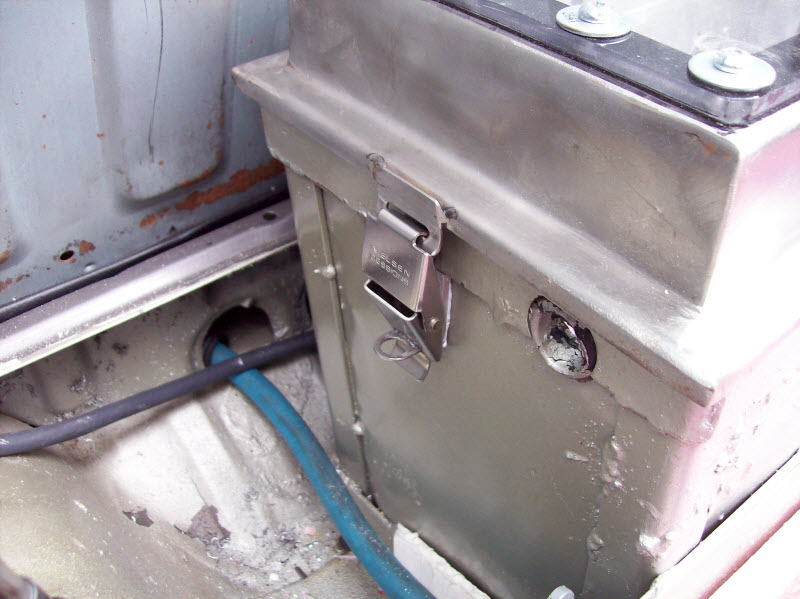
With the single Battery Box Cover in Place - I began to deal with the issues of the main Rear Battery Box Cover and it's fit.

First - were the aft most flat edges, being at 90 degrees - they were scraping the plastic trim that was not in place when they were welded up, so I had to do some trimming and fitting - for a few fit cycles to get that right.
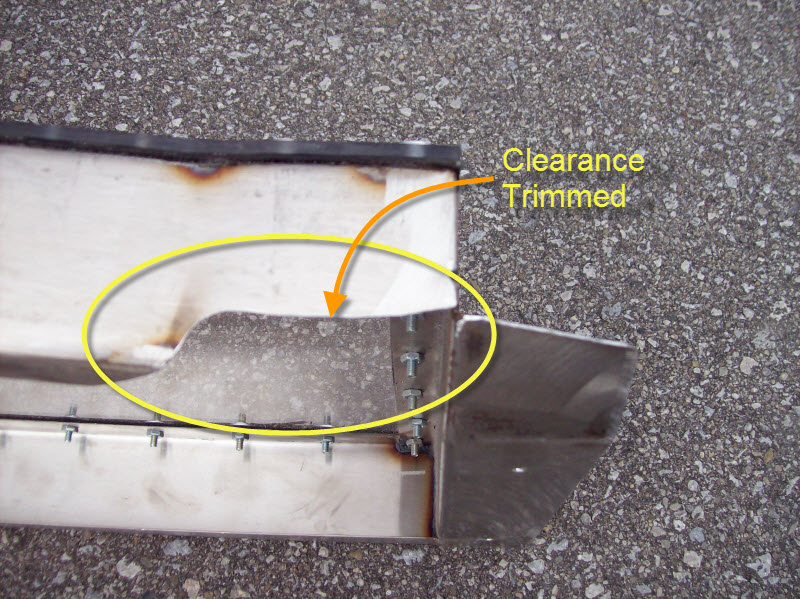
Then - was the issue of wire bundle clearance under the rear corners, and after hack-sawing, and grinding a few times, - I came up with cutting a much larger clearance, so I cut away more material, and used the 1" rotary File to Grind away and radius the corners for a safer, smoother clearance with fewer sharp edges.

Next - was the issue of the 4 original holes - that we first drilled in the side flanges along it's center-line, but they were along the edges of a dip, and on the side - where the hole - while vertical - would end up tipped inward on all 4 holes if I simply inserted the desired screw-nuts. So I decided to again get out the Mighty Putty - and simply use it to fill and level the space. First - I took my Wire Wheel (Actually - a synthetic replacement) in a 3" Dia. and using the Drill - I cleared away - Paint, Rust inhibitor, and underlying Rust, before using a small steam cleaner to cleanse the area of fine particles, dust, and crud. Drying that first with paper towel, and then my heat gun, I was then ready for the Might Putty!

After cutting 4 pieces of thin coat-hanger sized rod to insert in the 4 holes, I mixed the putty - one hole at a time, and then forced it into the depressed area an around the rod, wiggling the rod to keep the hole clear, and patting it down to make a basic Level condition. It was not until I got to the last hole - that I thought to use a stiff plastic Spreader - to pat it down in a true flat surface! (The others were already too hard to mold any more by that point.)

After letting them cure for about 10 more minutes - I got out the Heat Gun again - and gave them a bit of acceleration. Then - I started to mask off the area around each sides two holes, and once that was done - I shot them again with rust Primer, for a few coats and let them cure for another day!

After Removing the masking and paper, I chose the size of Screw Nuts (10-24), and drilled the insert hole for them. Unfortunately - I only had handy 1/4" drill bits, and needed a bit larger. So - I took a Round file and began to work the holes to make them larger - until the screw nut just slipped in.

Unfortunately - I made one hole a touch too large, and so - after installing the screw nuts, and fitting the cover, and testing the fit with  bolts - the loose one pulled up. I will have to get a fresh one - and start again - but likely use a bit of fresh Mighty Putty with the install - or some other Epoxy - and let it cure before testing the tightening again!
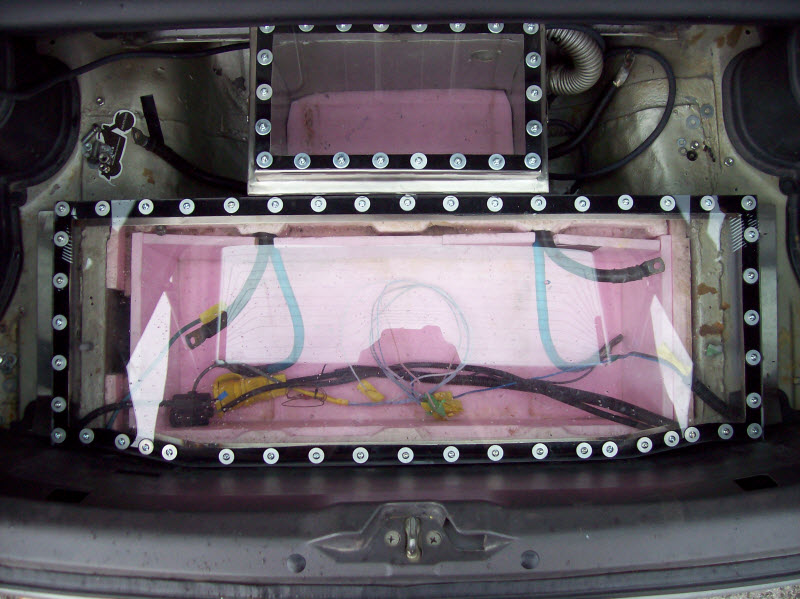
Here are the two covers in place - with the smaller Single Batter Box Cover forward, and the large - 4-Battery Cover Aft:

Once that test fit is in place - the next step is to secure spacers for the flanges - using 1/2" thick Pink Builders Extruded Foam, adhesives, and Epoxies, etc. to set up a hard and level offset to raise the cover flanges up so as to clear the wiring that enters the battery box from the back face.

Wednesday, August 1, 2012

A Couple Free EV Fest 2012 Tickets for my Followers!

Coming to EV Fest 2012? Want in for Free? Just start By Clicking Here to get your 100% Discounted Advance Guest Tickets  - On Me!

Oh - and I am getting some time to work on Electricfly - Have the Single Battery Box Cover Clips installed so I can Clip down and lock the Battery under a cover, as well as a Hold Down - keeping it away from prying fingers when I take it to shows - Like EV Fest 2012 Electric Vehicle Show!

Looking for More EV Fest 2012 Information - Come over to the site and See the Exhibitors, under the 'About' Menu item, or Get Tickets information under 'Tickets, etc. - go to EV Fest 2012 Electric Vehicle Show Website!

Saturday, May 12, 2012

EVCO EV Expo in Ottawa, Ontario - 1

Sitting in Brockville, on my way to the Electric Vehicle Council of Ottawa`s EV Expo! Have a stop to make' but should be there by lunch! I will see if I can get some good pics and info posted later.

Monday, March 12, 2012

Gas Pedal? What Gas Pedal? How about - How much Gas was saved?

Some people driving electric cars seem to get stuck on last century terminology - Gas Pedal! How about Accelerator Pedal? Or just Go pedal, the one beside the Stop pedal (The Brake Pedal)! Maybe we should color them Green for Go Pedals, and Red for Stop Pedals!

Also - some reports are coming in and say that Electric Car Sales have not exploded, so they must be dead!! Well - let's just compare - how many sales of other premium cars were there last year? (No - I don't have the answer - that's why it is a question!) Or - how about this - how many Extra Gallons (or Litres) of Gasoline were available for other drivers last year because of the electric Cars that did get sold?

Since an Electric car uses no Gasoline - ALL of the Gas it would have used if it were Gas Powered - is available for other cars! No Matter how many miles per gallon it would have gotten in a gas powered equivalent!

The Possibilities for an electric car to be fueled, if you will, by electrons moved by the sun, in your own properties space, via a Solar Photo-Voltaic panel (Solar PV, or Solar Electric), while likely a bit on the expensive side, generally have issues with creation, but cause so very little pollution with use as to be nearly non-existent, EV + PV = The True Green Solution!

Search EV + PV and you will find a number of sites on this subject! Like Jeff Chan's very descriptive pdf report by Sherry Boschert.

Beyond that - in My mind - Solar Power Production, in Work Parking Lots, that Feed the Grid, and as electric vehicles grow in numbers - charge them up - would do a lot to clean up local air conditions in Cities, and reduce the concentration of pollutants along road sides and in work site parking lots!

For those who want, but can't afford, an Electric Car, and want more than a 15 - 20 mph electric scooter, there are high powered electric scooters and Electric Motorcycles coming out now for 25% of the cost of an Electric Car, with - in some cases - even more range!

In all - the day of the Gas Pedal - is something your Grand Children might not even know about! Maybe even your children, if you are still young yet! Between Electric Vehicles, and Self-Drive Technology - either one or both of these items are likely to remove the terminology of the 'Gas' pedal from our vocabulary!

Enjoy your Gas Pedal While you can!

Wednesday, March 7, 2012

Discovery about the Trojan SCS150 Flooded Lead Acid Battery - the 1 Hr Rating!!!

I Finally found out the Actual 1 hour rating of the Trojan 100 Ah SCS150 12V Battery! It looks like Trojan Document MFSCS-6/01 and compares the Trojan SCS Series - the 150, the 200, and the 225: Group 24, 27, and 31 - Respectively, showing their performance from 1 - 25 hours!


It is rated at just 30 Amps for 1 hour! That is just 30 Amp Hours when compared to the 1 hour test ratings of the Lithium Iron Phosphate Cells! So the Blog Post - comparing the ThunderSky 40 Ah cells to the Trojan 100 Ah Cells - is not realy so bad after all - with 33% More Energy to 100% DOD versus the Lead Acid, and - interesting enough - the PRC-1255A Batteries I just tried in the car, as a new set - had a spec rating at 1 hour of 32.1 Ah - even more than the Trojan 100 Ah Batteries, and they are rated at just 55 Ah! Plus - the Weights:

Trojan SCS150 Group 24 100Ah rating at 20 hours (30 Ah at 1 Hr) Battery Weights 50 Lbs each x 8 = 400 Lbs.

Power Battery PRC-1255S, with a 55 Ah Rating at 20 Hours (32.1 Ah at 1 Hr), Weighs just 44 lbs per battery x 8 = 48 lbs less at 352 Lbs!

The Thundersky 40 Ah Lithium Iron Phosphate puts out a full energy of 40 Ah to 100% DOD at 1 Hr, and weighs just a maximum of 1.6 Kg per cell x 32 cells = 51.2 Kg = 112.64 Lbs!! just 2.25 Trojan Batteries weight by comparison!